Calibrate Osmo iPad base to fix reflector errors
Osmo’s reflector error is a tiny hardware problem wearing a software-problem costume. The app may complain like the iPad has forgotten how cameras work, but most of the time the fix is not buried in settings. There is no magic “calibrate” button.
If you’re searching for how to check calibrate Osmo iPad base to fix reflector errors, here’s the blunt version: you are not calibrating software. You are physically aligning a mirror over the iPad’s front-facing camera so the app can see the play space. When that mirror is off by a few millimeters, blocked by a bulky case, or blasted by glare from a window, Osmo stops being a clever educational system and becomes a very expensive way to teach patience.
The mechanics of Osmo camera detection: why physical alignment matters
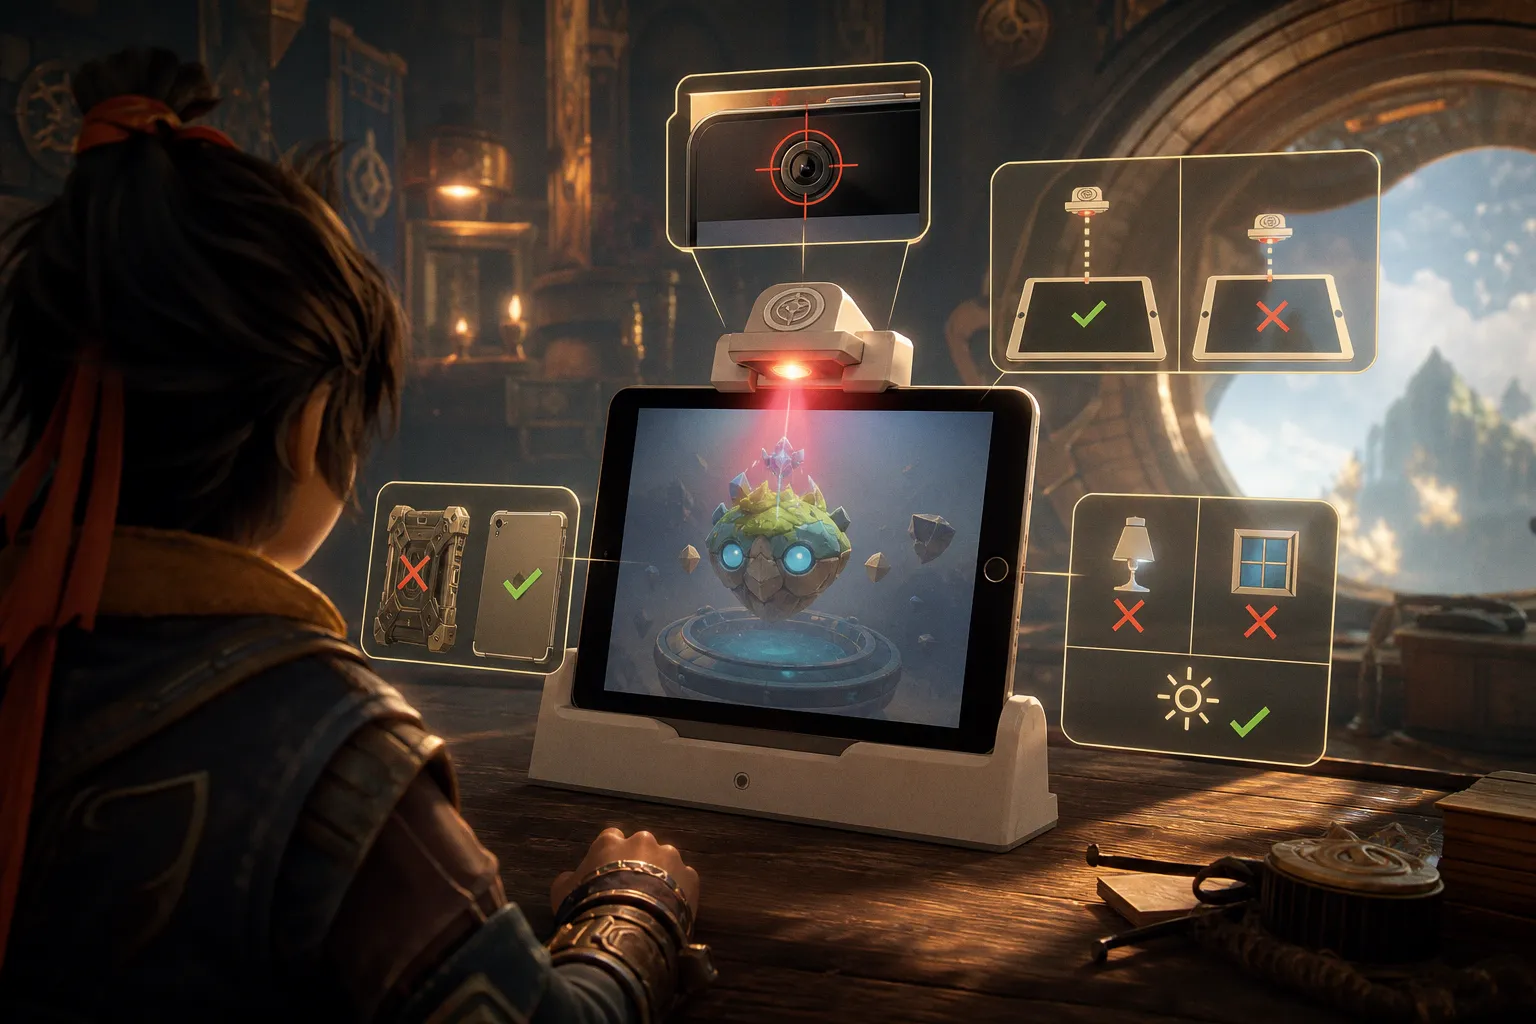
Osmo’s trick is simple and genuinely smart. The iPad’s front-facing camera normally looks at the person using the device. The Osmo reflector redirects that view downward, toward the table, where the child is placing tiles, drawing, coding blocks, numbers, letters, or whatever learning prop the app wants to inspect.
That is the whole game. Mirror. Camera. Table.
The reflector is not decorative. It is not a mascot hat for your iPad. It is the optical bridge between the app and the real-world play area. If that bridge is crooked, smudged, blocked, or reflecting a lamp instead of the tabletop, the app loses the plot.
This is where Osmo’s marketing language can get a bit airy. “Hands-on learning.” “Magical interaction.” “Seamless play.” Lovely. But under the sparkle is a very fussy camera system doing computer vision on a live feed. It needs contrast. It needs a clean image. It needs the reflector centered directly over the front-facing camera lens.
And when it does not get that? Reflector Error.
Osmo does not fail gracefully. It either sees the play area, or it throws up its hands and blames the reflector.
A lot of parents and teachers assume the base needs digital calibration because that is how modern tech usually trains us to think. Tap Settings. Toggle permissions. Restart. Pray. But with Osmo, calibration is mostly old-school: move the physical pieces until the camera sees what it is supposed to see.
That does not mean the app never matters. Camera permissions can matter. App state can matter. But the core issue is almost always physical alignment. The learning science here is good when the system works: fast feedback, tactile manipulation, a useful dopamine hit when a child solves something, and enough repetition to support skill building without turning the task into a worksheet in disguise. But none of that happens if the iPad is staring at the ceiling fan.
Precision positioning: centering the reflector over the lens
The first thing I check is painfully basic: is the reflector actually centered over the iPad’s front-facing camera?
Not “roughly near it.” Not “clipped on in the general neighborhood.” Centered.
The front-facing camera lens sits along the bezel edge of the iPad. The Osmo reflector must sit directly over it so the mirror can redirect the view properly. If the reflector is shifted left or right, angled, or sitting on a raised case lip, the camera sees a partial or distorted play area. The app then interprets that mess as a reflector detection problem.
Here is the practical alignment pass I use before blaming anything else:
1. Take the iPad out of the base completely.
Start clean. If the device is already wedged into the base at a slight angle, you will keep correcting around a bad setup.
2. Find the front-facing camera lens.
Do not guess. Look for the small camera dot on the front bezel. On some iPads it is easy to miss, especially under classroom lighting or fingerprints.
3. Place the iPad into the Osmo base in the correct orientation.
Some base setups expect portrait positioning; others are built around landscape use. If the iPad is rotated the wrong way for that base and game setup, the reflector will not line up with the lens. The app cannot negotiate with geometry.
4. Attach the reflector so it sits directly over the lens.
The mirror should be centered. No tilt. No half-grip. No “good enough.” The reflector must have a clean relationship with the camera.
5. Look at the play area from the app’s perspective if available.
Some Osmo flows show enough visual feedback to reveal whether the tabletop is visible. If the app still complains, do not tap wildly. Adjust the reflector physically.
6. Nudge the base, not just the reflector.
A tiny shift in base position can change what the mirror sends into the lens. Slide the whole setup back slightly. Then forward. Keep the play mat or pieces in the expected zone.
This is the moment where I usually mutter something unprintable about “smart toys.” Because the system is clever, yes, but it is also unforgiving. A kid can be doing the cognitive work correctly — recognizing patterns, matching phonemes, solving spatial puzzles — while the hardware sits there sulking because the mirror is two millimeters off-center.
What correct alignment looks like
Use this quick table when the setup still feels suspicious:
| What you see | Likely cause | Fix |
|---|---|---|
| Reflector Error appears immediately | Reflector not centered over front camera | Remove and reattach the reflector directly over the lens |
| App starts, then loses tracking | Base shifted or play area partly out of view | Re-seat the iPad and move the base so the play area sits squarely in front |
| Detection works only when you press the reflector | Case or bezel obstruction prevents firm attachment | Remove the iPad case and attach the reflector again |
| App detects pieces inconsistently | Glare, shadows, or angled mirror view | Improve lighting and check reflector angle |
| Nothing changes after app restart | Physical setup is still wrong | Stop rebooting; realign the base and reflector |
That last row is the one people hate. I hate it too. Restarting feels productive. Sometimes it is. But if the mirror is not aligned, rebooting just gives you a fresh copy of the same failure.
Environmental factors: eliminating glare and light interference
Osmo wants a well-lit room. It does not want a spotlight in its face.
That distinction matters. The reflector is a mirror, and mirrors are petty little chaos machines around direct light. A lamp, a bright window, or an overhead fixture reflecting into the mirror can blow out the camera image. The app may then think the reflector is missing, dirty, or badly positioned.
If you see a Reflector Error even after careful positioning, inspect the light. Not in a vague “is the room bright?” way. Actually look at what the mirror is catching.
Direct light sources that commonly cause trouble:
- A desk lamp aimed toward the iPad or table
- Sunlight hitting the reflector from a nearby window
- Strong overhead lighting bouncing off glossy table surfaces
- Bright white paper or laminated mats reflecting harsh light
- A shiny iPad screen protector catching glare near the camera edge
The annoying part: a room can look perfectly fine to your eyes and still be bad for Osmo’s camera view. Human vision is excellent at adapting. Camera-based detection is less forgiving. It sees blown highlights, deep shadows, and reflections as missing information.
Try this sequence:
1. Turn off any lamp pointed toward the iPad.
Side lighting is usually better than direct lighting. Give the camera visibility, not interrogation-room glare.
2. Move away from windows with direct sun.
Natural light is great until it becomes a laser bouncing off the reflector.
3. Use diffuse room lighting.
A bright room with soft overhead or ambient light is better than a dark room with one brutal desk lamp.
4. Check the table surface.
Glossy white tables can reflect light into the mirror. If the surface is shiny, try a matte play mat or move to a less reflective table.
5. Clean the reflector gently.
Smudges and fingerprints can scatter light. Use a soft cloth. Do not attack it like you are sanding furniture.
More light is not always better. Osmo needs usable light, not a mirror full of sunburn.
This is where Osmo’s educational promise bumps into classroom reality. In a controlled product video, the table is clean, the lighting is soft, and the child has apparently never dropped a juice box. In a real kitchen or classroom, you get glare, crumbs, thick iPad cases, ceiling lights, and a child trying to solve a math puzzle while someone else is shouting about a missing sock.
So yes, check the environment. Not because the app is delicate in some mystical sense. Because camera-based learning tools live or die by image quality.
For families comparing digital tools with more traditional learning support, it can help to step back and look at broader education resources such as education and course preparation materials before deciding whether a camera-based play system is the right fit for a particular learner.
Hardware compatibility: removing obstructions and iPad cases
Now we get to the villain I see most often: the iPad case.
A thick protective case is great when a child treats the iPad like a cafeteria tray. It is less great when the Osmo base needs the tablet to sit flush and the reflector needs to clip cleanly over the camera.
The reflector must attach close enough to the lens to redirect the view accurately. Bulky cases can interfere in several ways:
- They lift the reflector away from the camera.
- They prevent the reflector from sitting flat.
- They shift the iPad’s position inside the base.
- They block part of the camera edge.
- They create a weird angle that makes the mirror point at the wrong patch of table.
I know. Removing the case is irritating. It adds friction. It also feels like an invitation for disaster if the iPad is being used by a six-year-old with the motor planning of a caffeinated raccoon. But if the base is not sitting correctly, the app will keep failing.
My rule: test naked first.
Not forever. Just for diagnosis. Remove the case, place the iPad directly into the Osmo base, attach the reflector, and run the app again. If the error disappears, the case was the culprit. Congratulations. Also, condolences.
Case and fit diagnosis
| Hardware condition | What it does to Osmo | What to do |
|---|---|---|
| Thick rubber case | Stops the iPad from sitting flush in the base | Remove the case during Osmo sessions |
| Raised camera-edge lip | Prevents reflector from centering over the lens | Remove case or use a slimmer compatible case |
| Loose base fit | Lets iPad lean or shift during play | Re-seat device and keep table stable |
| Screen protector with glare | Adds reflections near camera/reflector area | Change lighting angle or test without harsh light |
| Third-party reflector | May not align like the official part | Test with official Osmo hardware if available |
I am deliberately not pretending every third-party accessory is doomed. Some work. Some do not. The problem is that Osmo’s whole system depends on the relationship between the lens, mirror, base angle, and play area. A third-party reflector that is even slightly off can sabotage detection. Unless you can confirm compatibility, treat unofficial reflectors as suspects.
The base model also matters. Osmo hardware has changed across iPad generations and orientations. If the iPad is placed in the wrong direction for the base you have, the reflector may clip on but still miss the lens alignment. That is the worst kind of failure: it looks assembled, but it is optically wrong.
This is why I do not call Osmo “plug and play” without a raised eyebrow. It is “plug, align, squint, adjust, and then play.”
Troubleshooting persistent detection failures without software menus
Here is the trap: once the reflector error persists, people start hunting for a calibration setting inside the app.
Do not waste the afternoon. Osmo does not have a software-based calibration button for this. The calibration is physical. The mirror either sends the correct view into the front camera or it does not.
That said, there are still software-side basics worth checking after the hardware setup is correct. Not because software calibration exists. It does not. But because the app still needs camera access and a clean run state.
Work through the failures in this order:
1. Confirm camera permission.
If the app cannot access the camera, no amount of reflector fiddling will help. Check the iPad’s privacy settings and make sure the Osmo app is allowed to use the camera.
2. Force close and reopen the Osmo app.
This clears a stuck session. It does not recalibrate the reflector. It just gives the app a clean attempt to detect the play area.
3. Re-seat the iPad in the base.
Do this after the app restart. The iPad may have shifted while you were tapping around.
4. Remove the case and test again.
Yes, again. Cases are repeat offenders. I give them no benefit of the doubt.
5. Move to a different lighting setup.
If you were near a window, move away. If you were under a harsh lamp, use softer room light.
6. Inspect the reflector for damage or dirt.
A scratched, cloudy, or fingerprint-covered mirror can degrade detection. Wipe it gently and check whether it sits securely.
7. Check the game’s expected play area.
Some Osmo games expect pieces or drawings in a particular zone in front of the base. If the child is working too far left, right, or close to the iPad, tracking may fail or become flaky.
Notice what is missing from that list: “Open calibration settings.”
Because they are not there.
The fastest isolation test
When I want to find the fault quickly, I strip the setup to the simplest possible version:
- iPad out of its case
- Official base on a stable, matte table
- Reflector centered over the front-facing camera
- Soft, even room lighting
- No direct lamp or window glare
- App camera permission enabled
- Game pieces placed in the expected play area
If it works in this stripped-down setup, the Osmo hardware is probably fine. Then you add variables back one at a time: case, original table, original lighting, classroom position, different app. The moment the error returns, you have your culprit.
This is not glamorous. It is diagnostic discipline. The same way you do not test a child’s working memory in a room with a marching band, you do not test Osmo’s visual tracking with glare, a rubber case, and a reflector clipped on like an afterthought.
Typical mistakes that keep the reflector error alive
Most reflector problems survive because the user changes five things randomly and learns nothing. I have done it. Everyone has. Panic-tapping is the universal language of broken edtech.
Here are the mistakes I would stop first:
1. Treating the reflector like an accessory instead of the optical system.
The mirror is the system. If it is not centered over the camera, the app is blind.
2. Leaving the iPad case on during diagnosis.
A case can make the setup look normal while quietly ruining the geometry. Remove it before making any judgment.
3. Using harsh light because the app “needs brightness.”
Bright is good. Glare is poison. A direct reflection in the mirror can wreck detection.
4. Assuming the iPad orientation is correct because it fits.
Fitting into the base is not the same as aligning with the reflector. Check the required orientation for the base and app setup.
5. Expecting an update to fix a physical problem.
Software updates can fix bugs. They cannot move a mirror two millimeters to the left.
6. Letting kids keep playing while you troubleshoot.
I admire the optimism. But moving hands, tiles, and elbows add visual noise. Clear the area, fix detection, then bring the learning chaos back.
7. Ignoring the table surface.
Shiny tables, patterned surfaces, and clutter can all make the camera’s job harder. Give the app a clean view.
The deeper lesson is that Osmo is not a tablet-only app. It is a mixed physical-digital learning system. That is its strength. It gets kids manipulating real objects, not just poking glass for another dopamine hit. But physical systems have physical failure points. The base, reflector, lighting, table, and case all matter.
When the setup finally works: what “good” should feel like
A properly aligned Osmo setup should feel boring. That is the goal.
The app should recognize the reflector without drama. Pieces should register consistently. The child should be able to focus on the learning task rather than watching an adult conduct amateur optics repair.
In a good session, Osmo’s design can shine. The best activities create a tight feedback loop: child acts, system responds, child adjusts. That loop supports attention and pattern recognition. In some games, it can reinforce spaced repetition without making repetition feel like punishment. In better puzzle tasks, the physical pieces add a spatial reasoning layer that a flat touchscreen often lacks.
But the hardware must disappear into the background. If the child spends more time waiting for detection than solving, the educational value collapses. Not slowly. Instantly.
This is my standard for any educational gadget: the tech should reduce friction around learning, not become the curriculum. If the lesson turns into “how to appease the reflector,” we have left pedagogy and entered tech support theater.
Final verdict: calibrate with your hands, not your hopes
To fix Osmo reflector errors, stop searching for a software calibration menu. The practical answer to how to check calibrate Osmo iPad base to fix reflector errors is physical: center the reflector over the front-facing camera, seat the iPad correctly in the base, remove bulky cases, kill glare, and give the camera a clean view of the play area.
That is the whole unromantic truth.
Download the app updates, sure. Check camera permissions, yes. But do not let those steps distract from the main event. Osmo’s reflector detection depends on alignment, lighting, and unobstructed hardware. Get those right and the system usually snaps back into place.
Who should keep using Osmo? Parents and teachers who like tactile learning, can tolerate a little setup fuss, and want screen time that asks for actual thinking. Who should skip it? Anyone expecting a zero-maintenance tablet app. Osmo is clever. It is also picky. Treat it like a small optical instrument, not a toy hat for an iPad, and it behaves much better.